This is my PICkit 2 clone design. Its based on a simplified version of the Microchip PICkit 2 schematic and only supports 5v parts. It works with all the Microchip software including MPLAB, MPLABX,the PICkit 2 GUI Programming software and the PICkit 2 command line software.
FIG1: CIRCUIT DIAGRAM
FIG2: 3D PREVIEW
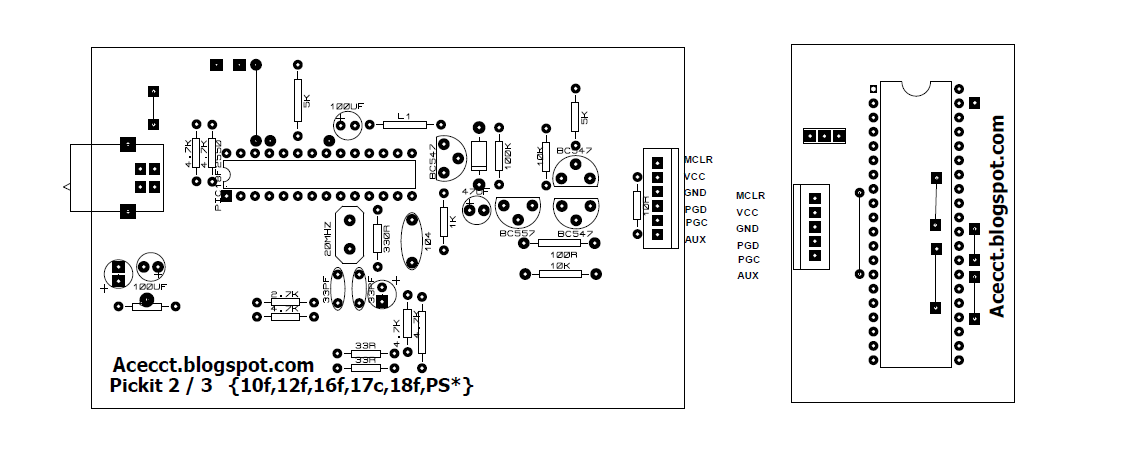
FIG3: PCB VIEW1
FIG4: PCB VIEW2
FIG5: PCB VIEW3
FIG6: TESTING1
FIG6: 28 PIN uC configration
FIG6: 18 PIN uC configration
FIG6: 8 PIN uC configration
FIG6: 8 NEW PICKIT2 WITH DSP SOCKET
To purchase PICKIT 2 CLONE PROGRAMMER (empty & complete)
Lagos (nigeria): Call- 09020322481
Akure (nigeria): Call- 08123206299
Email : acecct.18f4550@gmail.com
If you have any question, feel free to comment on this post.... acecct.18f4550@gmail.com OR whatsapp me on : +2348123206299
To make smart looking PCB's, all you need is: A computer, a laser printer, copper clad board, etchant, A3/A4 laminating machine and some glossy photo paper. You can buy special film for making PCB's, but I have found that the glossy paper gives better results. I use photo quality glossy paper for inkjet printers.
I got an A3/A4 laminating machine for about $40(N 8000) in the computer store last week, for my sine wave mother board production, and i needed to produce a total sum of 50 pcs control boards for a new consumer of mine... then, i got tried of the forward and the reverse of a single control board for about 25 times to get it done... well, i was able to press about 12pcs in 2 days... then i taught of making a pcb assistant laminator control with a lcd display...
Use a laser printer to print the image on the glossy side of the photo paper. Clean the copper clad board with steel wool or very fine wet sandpaper. Dry the board thoroughly. Make sure that the board is clean and free from fingerprints. Place the photo paper face down on the copper clad board. Use masking tape to hold the paper in position. Don't use vinyl tape. Place the board on a flat surface. You will be using a very hot iron, so don't use the dining room table. I use the back of an old telephone directory. Use a hot clothes iron to transfer the track pattern from the paper to the copper board. Don't be afraid to use lots of heat and pressure. Allow the board to cool. Don't be tempted to lift the paper. Put the board in a container full of warm soapy water. After about twenty minutes the paper will begin to dissolve and disintegrate. Carefully remove the paper from the copper board. Rinse under a cold tap to remove paper residue. You may need to touch up any broken tracks with an etch resist pen. I use a fine Staedtler laundry marker.
'**************************************************************** '* Name : LAMINATING MACHINE.BAS * '* Author : AKINSINMIDE IMOLEAYO * '* Notice : Copyright (c) 2015 [select VIEW...EDITOR OPTIONS] * '* : All Rights Reserved * '* Date : 5/31/2015 * '* Version : 1.0 * '* Notes : * '* : * '****************************************************************
'F876A
Define OSC 4 ' 4MHz crystal used
' Define ADCIN parameters Define ADC_BITS 10 ' Set number of bits in result Define ADC_CLOCK 3 ' Set clock source (3=rc) Define ADC_SAMPLEUS 50 ' Set sampling time in uS
'--------------[LCD DEFINES]---------------------- DEFINE LCD_DREG PORTC ' LCD Data bits on PORTC DEFINE LCD_DBIT 4 ' PORTB starting address DEFINE LCD_RSREG PORTC ' LCD RS bit on PORTC DEFINE LCD_RSBIT 2 ' LCD RS bit address DEFINE LCD_EREG PORTC ' LCD E bit on PORTC DEFINE LCD_EBIT 3' LCD E bit address DEFINE LCD_BITS 4 ' LCD in 4-bit mode DEFINE LCD_LINES 2
'-------------[PORT INITIALIZATION]----------------- TRISA = 001111 ' Set PORTA as INPUT AND OUTPUT ADCON1 = %10000010 ' Set PORTA analog and right justify result PORTB = 000000 'set PORTB as output TRISB = 001111 'set TRISB as both input and output
'VARIABLE ------------------------------ A VAR WORD : A = 0 B VAR WORD : B = 0 LED_FLASH VAR BYTE BT VAR WORD : BT = 0 BT1 VAR WORD : BT1 = 0 BT2 VAR WORD : BT2 = 0 UNIT VAR WORD [40] : UNIT = 0 L_UNIT VAR WORD : L_UNIT = 0 W_UNIT VAR WORD : W_UNIT = 0 R_UNIT VAR WORD : R_UNIT = 0 RUN_UNIT VAR WORD : RUN_UNIT = 0 COUNTEXIT VAR WORD : COUNTEXIT = 0 COUNTOK VAR WORD : COUNTOK = 0 COUNTRUN VAR WORD : COUNTRUN = 0 COUNT_EXIT VAR WORD : COUNT_EXIT = 0 L0 var word : L0 = 0
'----------- [PORT B] ------------- BUZZER VAR PORTB.7 FORWARD VAR PORTB.6 BACKWARD VAR PORTB.5 ON_OFF VAR PORTB.4 OK_KEY VAR PORTB.3 EXIT_KEY VAR PORTB.2 UP_KEY VAR PORTB.1 DOWN_KEY VAR PORTB.0
'----------- [PORT C] ------------- WORKING_LED VAR PORTC.0 FINISHED VAR PORTC.1 BUZZ_DELAY CON 120
FOR COUNTOK = 0 TO 10 LCDOUT " PRESS OK " LCDOUT $FE, $C0 : LCDOUT " TO CONTINUE ": PAUSE 120 IF OK_KEY = 0 THEN HIGH BUZZER :PAUSE BUZZ_DELAY :LOW BUZZER :PAUSE 3000 GOTO RUN ENDIF NEXT COUNTOK LCDOUT $FE,1 ' CLEAR SCREEN
FOR COUNTEXIT = 0 TO 10 LCDOUT " PRESS EXIT " LCDOUT $FE, $C0 : LCDOUT " TO CANCEL ": PAUSE 120 IF EXIT_KEY = 0 THEN HIGH BUZZER :PAUSE BUZZ_DELAY :LOW BUZZER :PAUSE 10 GOTO MEASURE ENDIF NEXT COUNTEXIT LCDOUT $FE,1 ' CLEAR SCREEN
GOTO START
RUN: LCDOUT $FE,1 ' CLEAR SCREEN PAUSE 2 : UNIT = 0 LCDOUT " PRESS OK !!! "
GET_RUN: pause 10 : GOSUB GET_KEY LCDOUT $FE, $C0 : LCDOUT "COUNT: " , DEC2 UNIT ," TIMES" IF OK_KEY = 0 THEN RUN_UNIT = UNIT HIGH BUZZER :PAUSE BUZZ_DELAY :LOW BUZZER :PAUSE 2 LCDOUT $FE,1 ' CLEAR SCREEN GOTO LAMINATE ENDIF GOTO GET_RUN
LAMINATE : ' laminating starts here LOW FINISHED : high WORKING_LED : LOW FORWARD PAUSE 1500 LCDOUT $FE,1 ' CLEAR SCREEN IF RUN_UNIT < 1 THEN GOTO DONE LCDOUT "<<< WORKING. >>>" LOW FINISHED : HIGH WORKING_LED HIGH BUZZER :PAUSE BUZZ_DELAY :LOW BUZZER :PAUSE 3000 HIGH FORWARD : PAUSE 4000 HIGH BUZZER :PAUSE BUZZ_DELAY :LOW BUZZER :PAUSE 2 LOW FORWARD : PAUSE 4000
'||||||||||||||||||||||||||||||||||||||||||||||||| ' CALCULATE MOVEMENT L_UNIT = L_UNIT - 1 A = 1580 * L_UNIT B = 1000 '||||||||||||||||||||||||||||||||||||||||||||||||
RUN_LAMINATE:
FOR COUNTRUN = 1 TO RUN_UNIT LCDOUT "<<< WORKING. >>>" LCDOUT $FE, $C0 : LCDOUT "COUNT ON : " , DEC2 COUNTRUN,"/",dec2 RUN_UNIT IF EXIT_KEY = 0 THEN HIGH BUZZER :PAUSE BUZZ_DELAY :LOW BUZZER :PAUSE 2 LCDOUT $FE,1 ' CLEAR SCREEN UNIT = 0 L_UNIT = 0 W_UNIT = 0 R_UNIT = 0 LCDOUT $FE, $C0 : LCDOUT " TASK CANCELLED " : PAUSE 2500 GOTO MEASURE ENDIF
MOVE_FORWARD: HIGH FORWARD : PAUSE A LOW FORWARD : PAUSE B
MOVE_BACKWARD: HIGH BACKWARD : PAUSE A LOW BACKWARD : PAUSE B
LCDOUT $FE,1 ' CLEAR SCREEN pause 1000 NEXT COUNTRUN