FINGER PRINT ACCESS CONTROL USING FPM10A
In some situations, the use of keycards may not be suitable or
sufficient. They can be lost, forgotten, given to someone else or
manipulated. Some security environments require an exact verification of
the user’s identity, which adds significantly to costs when done
manually.
The most accurate and cost-efficient way to identify
people is through biometric fingerprint system. A fingerprint cannot be stolen, which reduces
security risk. It cannot be given to a colleague (by an employee), hence
no more buddy punching. And a biometric fingerprint system costs a lot
less than security guards.
The featuring mircontroller is the atmega326p with 32kb program memory size.
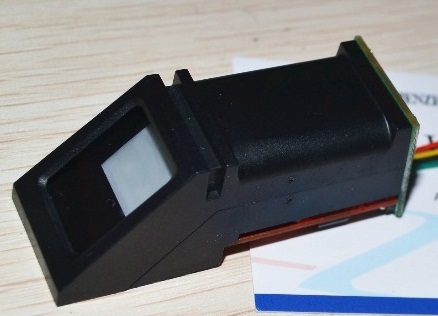
Fingerprint Recognition Module is : FPM10A which as the follwoing features:
Power supply voltage: DC 3.6~6.0V
Supply current: working current: <120mA
peak current: <140mA
The time of fingerprint image input: < 1 seconds
The window size: 14 x 18 mm
Profile: 256 bytes
Template file: 512 bytes
Storage capacity: 1000
False accept rate (FAR): < 0.001% (safety grade 3)
FRR (FRR): < 1% (safety grade 3)
The search time: < 1 seconds (1:500, mean)
Computer interface: UART (TTL logic level)
The communication baud rate (UART): (9600 x N) BPS where N=1 ~ 12 (the default value of N=6, namely 57600bps)
Working environment: temperature: -20°C to +50°C
Relative humidity: 40%RH to 85%RH (no treatment)
Storage conditions: temperature: -40°C to +85°C
Relative humidity: < 85%H (no treatment)
Dimensions (L * W * H):56 x 20 x 21.5mm
FPM10A - Fingerprint Recognition Module
IST TEST WITH UNO AS SERIAL COMMUNICATOR
CIRCUIT DIAGRAM
COMPONENT SIDE
COPPER SIDE
PCB BOARD PRINTED
ASSEMBLING 1
ASSEMBLING 2
FINISHED FINGER PRINT ACCESS CONTROL LOCK
CODE: // code written in c language
//ACE TECHNOLOGY '14
//FINGER PRINT ACCESS CONTROL
//ATMEGA328
//ACECCT.BLOGSPOT.COM
// set pin numbers:
const int ADD = 4; // Funtion as both add and up key
const int DELETE = 5; // Funtion as both delete and down key
const int OK1 = 6; // ok KEY Funtion as both ok/ 1
const int DOWN0 = 7; // down/0
int ID2 = 0;
#include <Wire.h>
#include <Adafruit_Fingerprint.h>
#include <SoftwareSerial.h>
// include the library code:
#include <LiquidCrystal.h>
// initialize the library with the numbers of the interface pins
LiquidCrystal lcd(8, 9, 10, 11, 12, 13);
int getFingerprintIDez();
//uint8_t getFingerprintEnroll(int id);
// pin #2 is IN from sensor (GREEN wire)
// pin #3 is OUT from arduino (YELLOW wire)
SoftwareSerial mySerial(2, 3);
Adafruit_Fingerprint finger = Adafruit_Fingerprint(&mySerial);
// CUSTOM LCD CHARACTERS -------------------------
byte LOCK[8] = {
0b00000,0b01110,0b10001,0b10001,0b11111,0b11011,0b11011,0b11111,};
byte UNLOCK[8] = {
0b00000,0b01110,0b10000,0b10000,0b11111,0b11011,0b11011,0b11111,};
//--------------------------------------------------
int buzzerdelay = 150; // delay funtion 1
int buzzerdelay2 = 200; // delay funtion 2
void setup() {
//PIN MODES DEFINATION AND RESETING ALL VARIBLES TO ZERO
pinMode(A0, OUTPUT); // LED
pinMode(A1, OUTPUT); // BUZZER
pinMode(A2, OUTPUT); // RELAY1
pinMode(A3, OUTPUT); // RELAY2
pinMode(ADD, INPUT); // input for the ADD KEY
pinMode(DELETE, INPUT); // input for the DEL KEY
pinMode(OK1, INPUT); // input for the UP/1 KEY
pinMode(DOWN0, INPUT); // input for the DOWN/0 KEY
digitalWrite(A0, LOW); // DEACTIVATED DOOR_LED>>> OFF
digitalWrite(A2, LOW); // DEACTIVATED DOOR_RELAY1>>> OFF
digitalWrite(A3, LOW); // DEACTIVATED DOOR_RELAY2>>> OFF
// initialize LCD and set up the number of columns and rows:
lcd.begin(16, 2);
//DEFINE CGRAM CREATED CHAR
lcd.createChar(1, LOCK);
lcd.createChar(2, UNLOCK);
//---------------------------------------------------------------
//---------------- QUICK INTRO -------------------
lcd.setCursor(2,0);
lcd.print("FINGER PRINT");
lcd.setCursor(1,1);
lcd.print("ACCESS CONTROL");
delay (2500);
//------------------------------------------------
// set the data rate for the sensor serial port
finger.begin(57600);
// Cheak if fp is well connected
if (finger.verifyPassword()) {
delay(1000);
lcd.setCursor(0,1);
lcd.print(" Sensor Found ");
delay (2500);
BUZZ();
delay(2500);
}
else {
lcd.setCursor(0,1);
lcd.print("Sensor not Found");
delay (2500);
while (1);
}
}
//----- BUZZING FUNTION ---------------
void BUZZ()
{
digitalWrite(A1, LOW);
delay(buzzerdelay2);
digitalWrite(A1, HIGH);
delay(buzzerdelay);
digitalWrite(A1, LOW);
delay(buzzerdelay2);
}
//-------------------------------------------
//----- DELETING COMMAND ---------------
void DELETE2()
{
uint8_t id = 0;
int count = 0;
lcd.clear();
lcd.setCursor(0,1);
lcd.print(" Deleting Mode ");
delay (2500);
lcd.clear();
lcd.setCursor(0,0);
lcd.print(" Type in the ID ");
lcd.setCursor(0,1);
lcd.print("You want to Del.");
delay (2800);
lcd.clear();
for (int count = 0; count < 2000; count++) {
//+++++++++++++++++++++++++++++++++++++++++++++++++++++
if ( digitalRead(ADD) == LOW)
{
id = ++ID2;
}
//-------------------------------------------------
if ( digitalRead(DELETE) == LOW)
{
id = ID2--;
}
//-------------------------------------------------
lcd.setCursor(0,1);
lcd.print("Deleting ID: ");
lcd.print(ID2);
delay (250);
//-------------------------------------------------
if ( digitalRead(OK1) == LOW) // OK KEY IS PRESSED
{
count = 2000;
BUZZ();
}
}
delay (3500);
if ( digitalRead(OK1) == LOW )
{
lcd.clear(); // WRONG COMBINATION....... KEY
lcd.setCursor(0,0);
lcd.print(" WRONG ");
lcd.setCursor(0,1);
lcd.print(" COMBINATION ");
delay (2500);
count = 2000;
}
}
//----- ADDING COMMAND ---------------
void ADD2()
{
uint8_t id = 0;
int count = 0;
lcd.clear();
lcd.setCursor(0,1);
lcd.print("Enrollment Mode");
delay (2500);
lcd.clear();
lcd.setCursor(0,0);
lcd.print("Enter the ID #");
lcd.setCursor(0,1);
lcd.print("For this finger");
delay (2500);
lcd.clear();
for (int count = 0; count < 2000; count++) {
//+++++++++++++++++++++++++++++++++++++++++++++++++++++
if ( digitalRead(ADD) == LOW)
{
id = ++ID2;
}
//-------------------------------------------------
if ( digitalRead(DELETE) == LOW)
{
id = ID2--;
}
//-------------------------------------------------
lcd.setCursor(0,1);
lcd.print(" Adding ID: ");
lcd.print(ID2);
delay (250);
//-------------------------------------------------
if ( digitalRead(OK1) == LOW) // OK KEY IS PRESSED
{
count = 2000;
BUZZ();
}
}
delay (3500);
if (digitalRead(OK1) == LOW )
{
lcd.clear(); // WRONG COMBINATION....... KEY
lcd.setCursor(0,0);
lcd.print(" WRONG ");
lcd.setCursor(0,1);
lcd.print(" COMBINATION ");
delay (2500);
count = 2000;
}
}
//_______________MAIN PROGRAM________________
void loop() // Main loop
{
uint8_t id = 0;
lcd.clear();
lcd.setCursor(0,0);
lcd.print(" Place Your ");
lcd.write(byte(1));
lcd.setCursor(0,1);
lcd.print("Finger To Unlock");
//+++++++++++++++++++++++++++++++++++++++++
if ( digitalRead(ADD) == LOW)
{
uint8_t id = 0;
ID2 = 0;
delay(1000); // wait for 1 second
digitalWrite(A0, HIGH); // ACTIVATED DOOR_LED
BUZZ();
delay(1000); // wait for 0.5 seconds
digitalWrite(A0, LOW); // ACTIVATED DOOR_LED
ADD2();
getFingerprintEnroll(id);
}
//+++++++++++++++++++++++++++++++++++++++++++++++
//+++++++++++++++++++++++++++++++++++++++++
if ( digitalRead(DELETE) == LOW)
{
uint8_t id = 0;
ID2 = 0;
delay(1000); // wait for 1 second
digitalWrite(A0, HIGH); // ACTIVATED DOOR_LED
BUZZ();
delay(1000); // wait for 0.5 seconds
digitalWrite(A0, LOW); // ACTIVATED DOOR_LED
DELETE2();
deleteFingerprint();
}
//+++++++++++++++++++++++++++++++++++++++++++++++
getFingerprintIDez();
delay(30); // get finger print id(S)
}
//___________________ADD____________________________
int getFingerprintEnroll(int id) {
uint8_t p = finger.getImage();
while (p != FINGERPRINT_OK) {
p = finger.getImage();
if (p == FINGERPRINT_OK) {// GET IMAGE ON WINDOW
lcd.clear();
lcd.setCursor(0,1);
lcd.print(" Image taken ");
BUZZ();
}
if (p == FINGERPRINT_NOFINGER) {// GET IMAGE ON WINDOW
lcd.clear();
lcd.setCursor(0,0);
lcd.print(" Place Your ");
lcd.setCursor(0,1);
lcd.print("Finger To Enroll");
}
}
p = finger.image2Tz(1);
if (p == FINGERPRINT_OK) {// convertion of image
lcd.clear();
lcd.setCursor(0,1);
lcd.print("Image converted");
delay (1800);
lcd.clear();
}
lcd.clear();
lcd.setCursor(0,1);
lcd.print(" Remove finger ");
delay (1800);
lcd.clear();
p = 0;
while (p != FINGERPRINT_NOFINGER) { //check if no finger on fingerprint
p = finger.getImage();
}
p = -1;
lcd.clear();
lcd.setCursor(0,0);
lcd.print(" Place the same ");
lcd.setCursor(0,1);
lcd.print(" finger again ");
delay (2000);
while (p != FINGERPRINT_OK) {
p = finger.getImage();
if (p == FINGERPRINT_OK) {// GET IMAGE ON WINDOW
lcd.clear();
lcd.setCursor(0,1);
lcd.print(" Image taken ");
BUZZ();
delay (2000);
lcd.clear();
}
if (p == FINGERPRINT_NOFINGER) {// GET IMAGE ON WINDOW
lcd.clear();
lcd.setCursor(0,0);
lcd.print(" Place Your ");
lcd.setCursor(0,1);
lcd.print("Finger To Enroll");
}
}
p = finger.image2Tz(2);
if (p == FINGERPRINT_OK) {// convertion of image
lcd.clear();
lcd.setCursor(0,1);
lcd.print("Image converted");
delay (2200);
}
// convertion OK
p = finger.createModel();
if (p == FINGERPRINT_OK) {
lcd.clear();
lcd.setCursor(0,1);
lcd.print("Prints matched!");
delay (2500);
}
if (p == FINGERPRINT_ENROLLMISMATCH) {
lcd.clear();
lcd.setCursor(0,0);
lcd.print(" Fingerprints ");
lcd.setCursor(0,1);
lcd.print(" did not match! ");
delay (2500);
return p;
}
lcd.clear();
lcd.setCursor(0,0);
lcd.print("Ur Fringerprint");
lcd.setCursor(0,1);
lcd.print(" ID Is: ");
lcd.print(ID2);
delay (2500);
p = finger.storeModel(ID2);
if (p == FINGERPRINT_OK) {
lcd.clear();
lcd.setCursor(0,1);
lcd.print(" Prints Stored! ");
delay (3000);
}
}
//___________________________________________________
//___________________DELETE____________________________
int deleteFingerprint( ) {
uint8_t p = finger.deleteModel(ID2);
p = finger.deleteModel(ID2);
if (p == FINGERPRINT_OK) {// GET IMAGE ON WINDOW
lcd.clear();
lcd.setCursor(0,0);
lcd.print(" Finger Print ");
lcd.setCursor(0,1);
lcd.print(" Deleted! ");
delay (2800);
}
}
//___________________________________________________
//Scan and search id image in database
int getFingerprintIDez() {
uint8_t p = finger.getImage(); //=====
if (p != FINGERPRINT_OK) return -1;
p = finger.image2Tz(); //=====
if (p != FINGERPRINT_OK) return -1;
//--------- CONFIRMATION BUZZ ----------------
digitalWrite(A1, HIGH);
delay(buzzerdelay);
digitalWrite(A1, LOW);
delay(1500);
//--------------------------------------------
p = finger.fingerFastSearch(); //=====
if (p == FINGERPRINT_OK) {
lcd.clear();
lcd.setCursor(0,0);
lcd.print(" Finger Print ");
lcd.setCursor(0,1);
lcd.print(" Id Matched ");
delay (2000);
lcd.clear();
lcd.setCursor(0,1);
lcd.print(" Your ID is: ");
lcd.print(finger.fingerID);
delay (2000);
lcd.setCursor(0,0);
lcd.print("Access Granted ");
lcd.write(byte(2));
lcd.setCursor(0,1);
lcd.print(" DOOR OPENED ");
delay (1000);
// Activate lock system
delay(500); //DELAY 0.5 Sec
digitalWrite(A0, HIGH); // ACTIVATED DOOR_LED
digitalWrite(A2, HIGH); // ACTIVATED DOOR_RELAY1>>> ON
digitalWrite(A3, LOW); // DEACTIVATED DOOR_RELAY2>>> OFF
delay (1500);
digitalWrite(A0, HIGH); // ACTIVATED DOOR_LED
digitalWrite(A2, LOW); // ACTIVATED DOOR_RELAY1>>> ON
digitalWrite(A3, LOW); // DEACTIVATED DOOR_RELAY2>>> OFF
delay(500); //DELAY 0.5Sec
for (int count = 11; count >=0; count--) {
lcd.clear();
lcd.setCursor(0,0);
lcd.print("Activating lock"); // DISPLAY THE AMOUNT OF SECONDS
lcd.setCursor(0,1); // REMAINING
lcd.print("In: ");
lcd.print(count);
lcd.print(" second(s)");
delay(1000); //DELAY 1 Sec
}
delay(500); //DELAY 0.5 Secs
digitalWrite(A0, HIGH); // ACTIVATED DOOR_LED
digitalWrite(A2, LOW); // DEACTIVATED DOOR_RELAY1>>> OFF
digitalWrite(A3, HIGH); // ACTIVATED DOOR_RELAY2>>> ON
delay(1500);
// DEFAULTING LOCK
digitalWrite(A0, LOW); // DEACTIVATED DOOR_LED>>> OFF
digitalWrite(A2, LOW); // DEACTIVATED DOOR_RELAY1>>> OFF
digitalWrite(A3, LOW); // DEACTIVATED DOOR_RELAY2>>> OFF
delay(2000);
}
else if (p == FINGERPRINT_NOTFOUND) {
lcd.clear();
lcd.setCursor(0,0);
lcd.print(" Finger Print ");
lcd.setCursor(0,1);
lcd.print(" Not Matched ");
delay (2000);
return p;
}
return finger.fingerID;
}


